Introduction
In today's rapidly evolving digital landscape, the coexistence of virtual machines (VMs) and containers has become a defining characteristic of modern infrastructure. While VMs and containers possess distinct characteristics, they share commonalities in their ability to encapsulate applications and efficiently manage computing resources. However, transitioning traditional VM-based workloads to containerized environments presents unique challenges.
Challenges
Legacy applications are often built on monolithic architectures and tightly coupled dependencies, which may not be easily containerized due to compatibility issues or resource constraints. Additionally, the ephemeral nature of containers contrasts with the persistent state of VMs and poses challenges for data persistence and application lifecycle management. Moreover, organizations need to navigate complexities related to networking, security, and compliance when transitioning to containerized environments. These challenges underscore the need for a solution that can seamlessly bridge the gap between VMs and containers, enabling organizations to modernize their infrastructure without sacrificing existing investments or compromising performance and reliability.
Enter KubeVirt — a groundbreaking solution that bridges the gap between VMs and Kubernetes, enabling seamless integration of legacy applications into cloud-native environments.
In this article, we will explore how can we use KubeVirt to solve the above challenges.
Virtual Machines and Containers in the Modern Landscape
VMs and containers represent two pillars of modern virtualization, each having its strength and characteristics in computing space. Containers are immutable and ephemeral, meaning that they can be and are created and destroyed all the time whereas VMs are a representation of physical machines where workloads run and must be maintained with more care. While VMs provide robust isolation and compatibility with existing infrastructure, containers offer agility and scalability. Despite their differences in the ability to create and orchestrate, VMs share parallels with container management tools like Kubernetes, underscoring the convergence of these technologies in modern IT environments.
Why would we need KubeVirt?
The trend towards adopting Kubernetes and cloud-native infrastructure has gained significant momentum in recent years driving organizations to modernize their IT operations to stay competitive in an increasingly digital world.
According to industry reports, the adoption of Kubernetes has seen exponential growth, with a large percentage of enterprises planning to migrate their workloads to Kubernetes clusters in the coming years.
- KubeVirt is useful particularly when we have to do Rehost.
- These applications may not be easily containerized due to their complex architecture or dependencies that lead to cost implications. It could also be due to cost implications. Here KubeVirt addresses these challenges by enabling organisations to run VMs alongside containerized workloads within the K8 clusters. This allows enterprises to leverage the benefits of K8 while preserving their investment in existing VM infrastructure.
What is KubeVirt?
KubeVirt is an open-source solution enabling the coexistence of VMs with containerized workloads within a Kubernetes cluster. This integration combines the benefits of traditional virtualization tools for VM management with the flexibility of Kubernetes APIs and utilities.
KubeVirt functions as an operator setting up a pod with two containers to oversee a VM. One container stores the VM's disk image, while the other manages the VM itself. Installing or removing KubeVirt on an existing cluster allows for the addition of VMs to clusters with established containerized applications. This capability proves valuable for the gradual migration of applications or for the relocation of monolithic applications that are challenging to containerize easily.

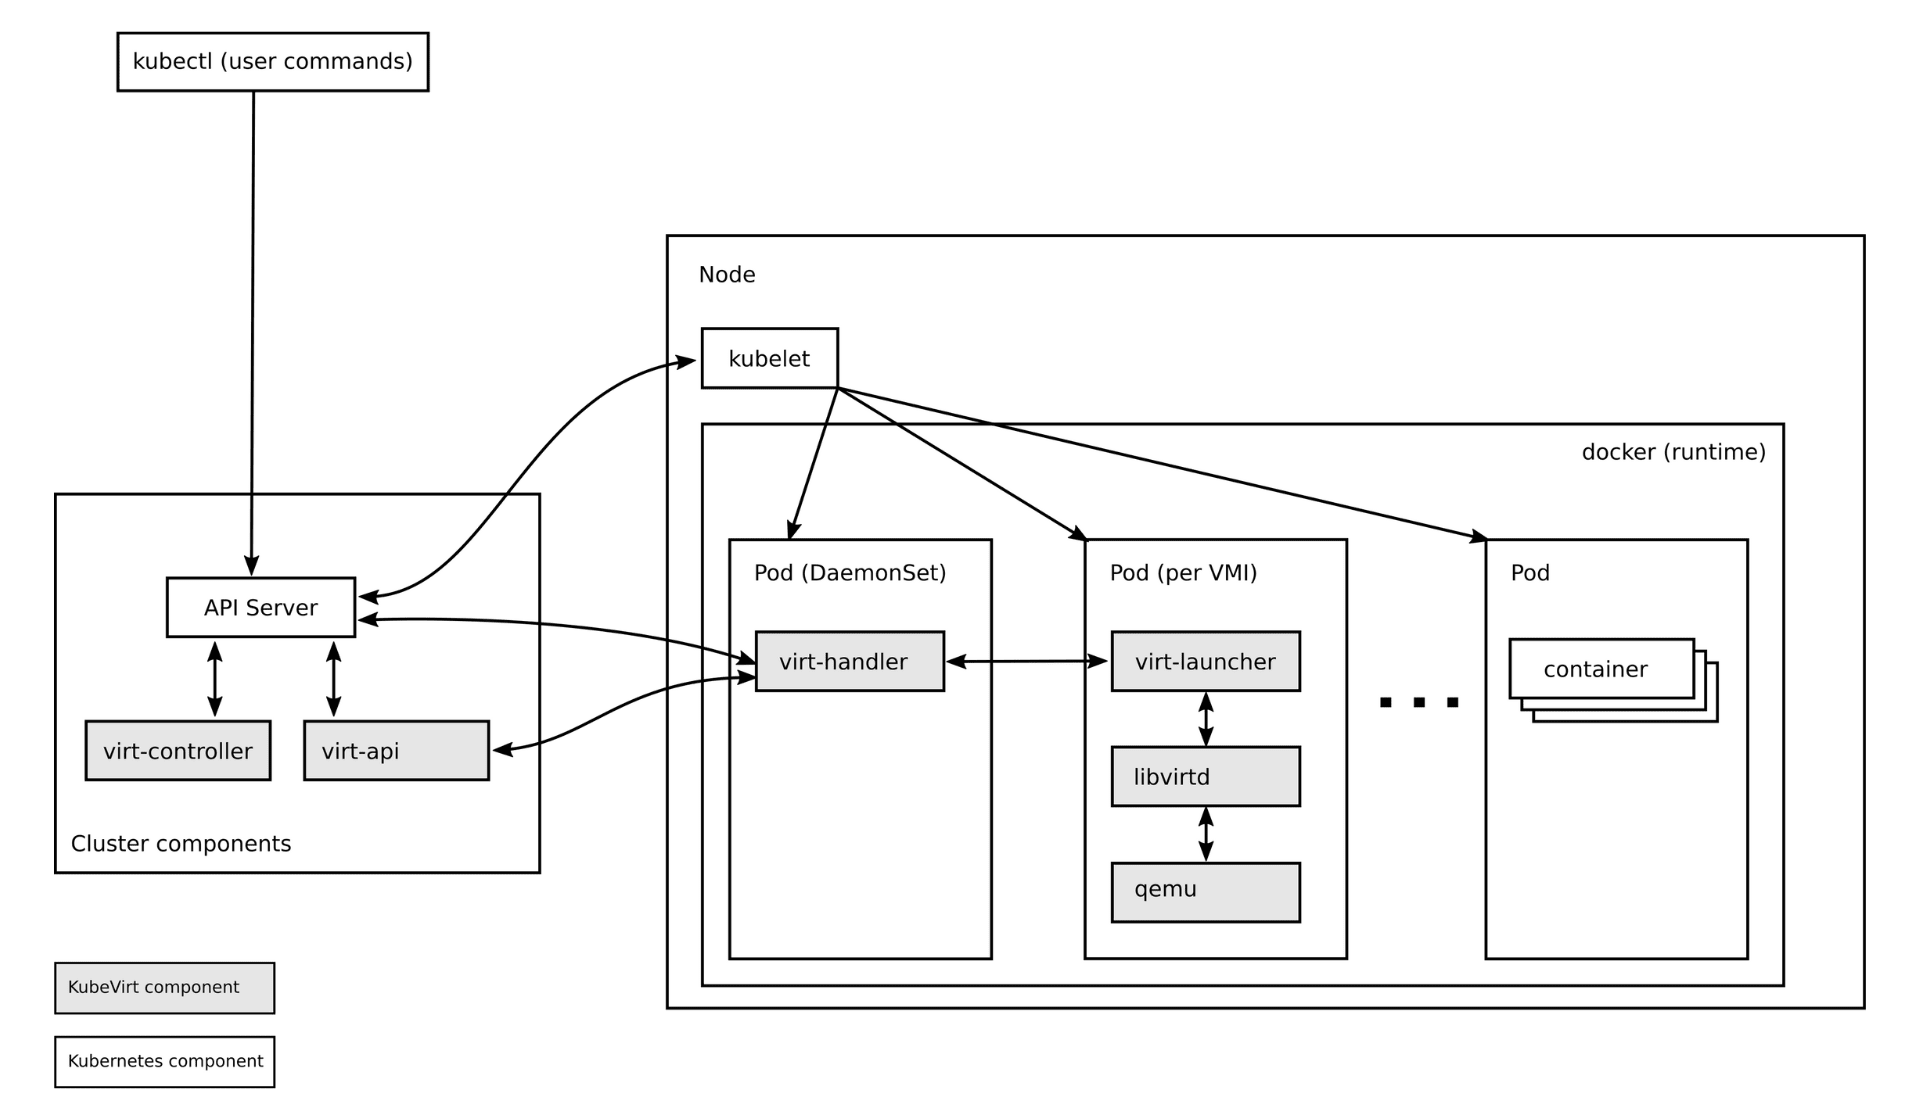
Fig 1: Architecture of KubeVirt Source - KubeVirt Official Doc
Components of KubeVirt
A comprehensive grasp of KubeVirt's internal mechanisms is vital for acquainting yourself with its core components. By delving into the functionality of each component, you will enhance your ability to effectively utilize KubeVirt within your Kubernetes environment.
Let’s dive into the core components of KubeVirt:
Virt-api-server
virt-api-server is a crucial component think of it as the control center for KubeVirt's virtual machines (VMs). It's the first stop for any request related to VMs, acting like a friendly receptionist. One of its key roles is ensuring everyone speaks the same language by validating and standardizing VM definitions (called VMI CRDs).
Virt Controller
The virt-controller is another component that handles the orchestration of virtual machines in KubeVirt. It’s a Kubernetes Operator responsible for cluster-wide virtualization functionality. The virt-controller notice of new VM objects posted onto the API server. Once it does, it creates a pod in which the VM runs. Once the pod is automatically scheduled to a particular node, the virt-controller changes the VM object with the node name. Then it hands off further responsibilities to the virt-handler node running on each node within the cluster.
Virt-handler
The virt-handler operates reactively, mirroring the behavior of the virt-controller. It closely monitors the changes to the VM object definition and automatically executes the required actions to ensure the VM conforms to its desired state. The virt-handler leverages libvirtd instances within the VM's pod to access the VM specifications and signal the creation of corresponding domains. Upon detection of a VM object deletion, the virt-handler observes the event and gracefully shuts down the associated domain.
Virt-launcher
KubeVirt creates one pod for every VM object. Then, the pod’s primary container runs the virt-launcher KubeVirt component. The main objective of the virt-launcher Pod is to provide the namespaces and cgroups that will host the VM process. virt-handler signals virt-launcher to start a VM by handing the VM’s CRD object to virt-launcher. The virt-launcher then employs a local libvirtd instance within its container to initiate the VM. Once this occurs, the virt-launcher monitors the VM process and terminates once the virtual machine has exited.
At times, the Kubernetes runtime may seek to terminate the virt-launcher pod before the completion of the VM process. When this happens, the virt-launcher forwards signals to the VM process and tries to slow the pod’s termination until the virtual machine has shut down successfully. Each VM pod houses an instance of libvirtd, with the virt-launcher overseeing the VM process lifecycle from libvirtd.
KuberVirt Demo
Prerequisites
To start with the deployment of KubeVirt and the first virtual machine we need to have the following tools to be installed:
- kubectl: command line tool to interact with Kubernetes
- kind: a tool for running local Kubernetes clusters on macOS, Linux, and Windows
- virtctl: a CLI created by the KubeVirt team which is needed to communicate with the created virtual machines (like connecting to a virtual machine via console). The binary is available for most operating systems and CPU architectures.
Let's create a Kubernetes cluster using kind.
 kind create cluster
bash
Deploying KubeVirt
Kubevirt is available via Kubernetes manifests, which manage the overall lifecycle of all the KubeVirt core components.
export VERSION=$(curl -s https://storage.googleapis.com/kubevirt-prow/release/kubevirt/kubevirt/stable.txt)
bash
Use kubectl to deploy KubeVirt operator:
echo $VERSION
kubectl create -f https://github.com/kubevirt/kubevirt/releases/download/${VERSION}/kubevirt-operator.yaml
bash
Again use kubectl to deploy the KubeVirt custom resource definitions:
kubectl create -f https://github.com/kubevirt/kubevirt/releases/download/${VERSION}/kubevirt-cr.yaml
bash
Wait for KubeVirt to be fully deployed. we check the phase of the Kubevirt CR itself by running the following command.
kubectl -n kubevirt get kubevirt
bash
Once KubeVirt deployment is completed, you will see Deployed phase.
Name     AGE    PHASE
Kubevirt 3m  Deployed
bash
Further validate the KubeVirt deployment:
kubectl get po -n kubevirt
NAME                               READY   STATUS    RESTARTS   AGE
virt-api-76b596f8b6-7728n          1/1     Running   0          8m6s
virt-controller-75c48bf4c7-5nht2   1/1     Running   0          7m1s
virt-controller-75c48bf4c7-tfvn4   1/1     Running   0          7m1s
virt-handler-xsn6d                 1/1     Running   0          7m1s
virt-operator-799f45dbdc-7lbs8     1/1     Running   0          9m37s
virt-operator-799f45dbdc-jh7kx     1/1     Running   0          9m37s
bash
KubeVirt controller and operators are up and running and all the KubeVirt pods are started and they should be in ready status.
Create VM using KubeVirt
Now we can create our first virtual machine. In this example, we are going to create an Ubuntu virtual machine with 2 CPUs, 8GB memory, and an SSH service to access the machine.
Follow the below manifest which describes a Virtual machine as well as service:
$ cat <<EOF > ubuntu-vm.yml
---
apiVersion: kubevirt.io/v1
kind: VirtualMachine
metadata:
  name: ubuntu-vm
spec:
  running: true
  template:
    metadata:
      labels:
        kubevirt.io/size: small
        kubevirt.io/domain: ubuntu-vm
    spec:
      domain:
        cpu:
          cores: 2
        devices:
          disks:
            - name: containerdisk
              disk:
                bus: virtio
            - name: cloudinitdisk
              disk:
                bus: virtio
          interfaces:
          - name: default
            masquerade: {}
        resources:
          requests:
            memory: 8192Mi
      networks:
      - name: default
        pod: {}
      volumes:
        - name: containerdisk
          containerDisk:
            image: tedezed/ubuntu-container-disk:22.0
        - name: cloudinitdisk
          cloudInitNoCloud:
            userDataBase64: ${CLOUDINIT}
---
apiVersion: v1
kind: Service
metadata:
  name: ubuntu-vm-svc
spec:
  ports:
  - port: 22
    targetPort: 22
    protocol: TCP
  selector:
    kubevirt.io/domain: ubuntu-vm
  type: NodePort
EOF
bash
In the Ubuntu image, we don’t have a preconfigured password. So we need to create a cloud-init configuration which consists SSH Public key and a preconfigured password. Let's create a file with the following content.
# cloud-config
users:

* default
* name: ubuntu
    passwd: "paswrd"
    shell: /bin/bash
    lock-passwd: false
    ssh_pwauth: True
    chpasswd: { expire: False }
    sudo: ALL=(ALL) NOPASSWD:ALL
    groups: users, admin
yaml
This cloud-init configuration script creates a new user named Ubuntu with a password. After the file gets created generate its base64 string and export the variable that is been used in the above YAML file.
export CLOUDINIT=$(base64 -i ./<cloudinit-filename>)
bash
Apply the manifest to Kubernetes.
$ kubectl apply -f ubuntu-vm.yml
virtualmachine.kubevirt.io/ubuntu-vm created
service/ubuntu-vm-svc created
bash
Check the status of the VM and service.
$ kubectl get vms
NAME                                  AGE     STATUS    READY
ubuntu-vm                             3m9s    Running   True

$ kubectl get svc ubuntu-vm-svc
NAME            TYPE       CLUSTER-IP     EXTERNAL-IP   PORT(S)        AGE
ubuntu-vm-svc   NodePort   10.104.3.114   <none>        22:31467/TCP   36s
bash
The VM is created but it is in stopped phase. We can start it manually or with automation.
Spec:
  running: false
yaml
Use virtctl CLI tool to manage the state of the VM as shown below.
$ virtctl start ubuntu-vm

$ kubectl get vm
NAME       AGE    STATUS    READY
ubuntu-vm   3m30s   Running   True
bash
VM should be running and the machine will be accessible via SSH.
SSH into the VM:
ssh <ip.of.your.workernode> -p 31467 -l ubuntu
bash
After running the SSH command, you might need to enter the password for the username you provided. Carefully copy and paste the password, then press Enter. Once you authenticate, you will be connected to the VM's command-line interface, where you can start executing commands and configuring the VM as needed.
To shutdown, VM instance can be stopped using command: virtctl stop vm-name. Additionally, we can also delete the VM by deleting the vms image kubectl delete vms ubuntu-vm.
How to create a VM image or which one does KubeVirt support?
Creating VM images compatible with KubeVirt is straightforward and ensures a smooth integration with Kubernetes clusters. Administrators can start by using existing VM images in formats like QCOW2, VMDK, or RAW, which KubeVirt fully supports. If needed, we can convert the VM images from other formats also, such as AWS AMI or Hyper-V VHD, using tools like QEMU. Once the image is in the right format, it's uploaded to a storage location that is accessible to the Kubernetes cluster. Further allowing VMs to manage alongside containers using familiar Kubernetes tools. Following these steps, we can create VM images that seamlessly fit into the KubeVirt ecosystem, maximizing the benefits of cloud-native infrastructure.
Limitations of KubeVirt
While KubeVirt offers a powerful solution for running virtual machines alongside containerized workloads within Kubernetes clusters, it's essential to be aware of its limitations. One notable limitation is the performance overhead introduced by virtualization, which can impact the overall efficiency and scalability of applications running on KubeVirt. Additionally, KubeVirt may not be suitable for all use cases, particularly those requiring low-latency or high-performance computing. Furthermore, managing and troubleshooting virtualized workloads in Kubernetes clusters can be more complex than traditional VM environments.
Despite these limitations, KubeVirt continues to evolve rapidly, with ongoing efforts to address performance bottlenecks and enhance usability. By understanding these limitations and evaluating use cases carefully, organizations can make informed decisions about adopting KubeVirt for their virtualization needs within Kubernetes environments.
Use cases
KubeVirt's ability to handle multiple VMs with persistent data makes it easy to combine for containerized workloads, microservices deployments, and large-scale cloud-native applications.
-
KubeVirt is a good solution to run virtual machines in a Kubernetes ecosystem since there are applications that can’t be relocated to cloud-native environments. With the help of KubeVirt, we can now move our applications which run on a physical or virtual server to managed VM instances in a kubernetes pod helping our applications to communicate more easily with containerized applications and making it easy to integrate our legacy applications into today’s modern architecture.
-
Machine Learning and AI Workloads: Certain machine learning and AI workloads may benefit from running in VMs due to specific hardware requirements or the need for GPU passthrough. KubeVirt allows you to manage these VM-based workloads alongside other Kubernetes-managed resources. You can run virtual machines with with AI packages and toolbox for data scientist in a cost effective way and use shared GPUs.
-
Hybrid Cloud Management: Organizations with hybrid cloud environments can use KubeVirt to manage both VMs and containers on the same Kubernetes platform. This simplifies operations and provides a consistent management interface across different environments.
Conclusion
KubeVirt is a great solution to run virtual machines in a Kubernetes ecosystem. By leveraging KVM technology and Kubernetes orchestration, KubeVirt Provides users with full control over their VMs. With the ability to run both VM-based and container-based applications within the same network, KubeVirt empowers organizations to efficiently manage diverse workloads and optimize resource utilization in their Kubernetes clusters.
If you are looking for migration support, contact us, we would love to help!


