

Introduction
ClickHouse has established itself as one of the leading columnar database management systems for analytical workloads, processing billions of rows in milliseconds. However, deploying a production-ready ClickHouse cluster comes with significant complexity — from configuring proper sharding and replication to optimizing system parameters for peak performance. In this technical deep-dive, I’ll walk through an enterprise-grade ClickHouse automation solution that eliminates deployment complexity while enabling hardware-aware configuration for optimal performance.
The automation solution we’ll explore allows engineers to deploy highly available, secure, and optimized ClickHouse clusters using a single configuration file and two commands. By the end of this article, you’ll understand how this Ansible project is structured, the key configurations it manages, and how it automatically tunes ClickHouse based on your hardware specifications.
Real-World Challenges in ClickHouse Deployment
Before diving into the solution, let’s understand the common challenges organizations face when deploying ClickHouse:
- Configuration Complexity: ClickHouse has hundreds of configuration parameters, many of which require careful tuning based on workload and hardware.
- Resource Optimization: Setting memory limits, cache sizes, and thread pools incorrectly can lead to performance issues or out-of-memory errors.
- High Availability Design: Implementing proper sharding and replication requires careful planning and configuration.
- Operational Readiness: Production deployments need comprehensive monitoring, backup solutions, and health checks.
- Security Implementation: Enterprise deployments require proper encryption, authentication, and authorization.
Key Features of the Ansible Automation
Let’s highlight what this automation solution provides:
- Hardware-aware configuration: Automatically optimizes ClickHouse settings based on available CPU cores and RAM
- Flexible cluster topologies: Supports arbitrary shard and replica combinations
- High availability: Configures ClickHouse Keeper (replacement for ZooKeeper) for distributed coordination
- Security hardening: Implements SSL/TLS, user authentication, and network restrictions
- Monitoring integration: Sets up Prometheus metrics endpoints and health checks
- Backup automation: Configures automated backup with optional S3 storage
- Schema management: Provides a framework for database and table creation
Getting Started: Initial Project Setup
The first step in using this automation framework is to run the setup script that generates the entire project structure. The script takes parameters for CPU cores and RAM to properly configure ClickHouse’s hardware-aware settings:
sudo ./setup-clickhouse-ansible.sh --cpu 32 --ram 256 --version 25.4.1.1
bash
This command generates output similar to:
ClickHouse Ansible Project Setup
Configuration:
  CPU Cores: 32
  RAM (GB): 256
  ClickHouse Version: 25.4.1.1
bash
Creating directory structure...
Creating initial configuration files...
Creating README.md...
Improved ClickHouse Ansible Project Structure Created Successfully!Usage:
./setup-clickhouse-ansible.sh --cpu 16 --ram 64 - Create project with 16 CPU cores and 64GB RAM
./setup-clickhouse-ansible.sh --cpu 32 --ram 128 --version 25.4.1.1 - Specify CPU, RAM and ClickHouse versionNext steps:
1. Edit config.yml to configure your cluster settings
2. Run ansible-playbook -i localhost, setup_inventory.yml -c local to generate inventory
3. Run ansible-playbook -i inventory.yml deploy_clickhouse.yml to deploy your cluster
bashThe setup script creates a complete Ansible project structure with all necessary roles, templates, and configuration files. It uses the CPU and RAM parameters to set default values in the configuration, but these can be further customized later.
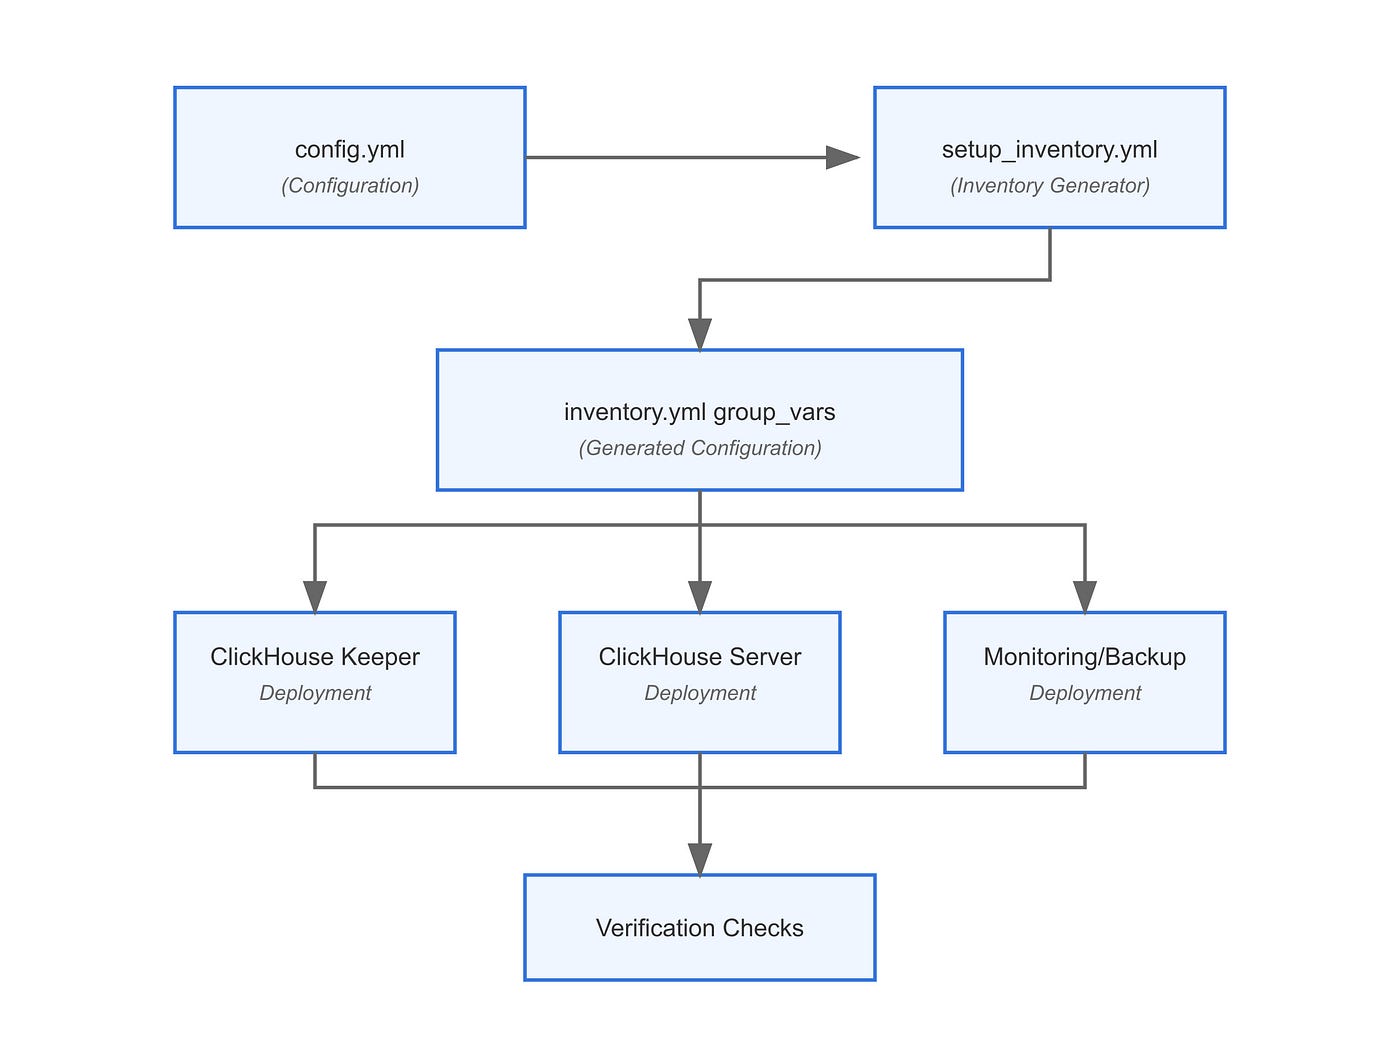
Architecture of the Automation Framework
The framework implements a comprehensive infrastructure-as-code approach with a clear separation of concerns:
Figure 1: High-level architecture of the ClickHouse Ansible automation framework
Understanding the Directory Structure
The Ansible project follows a well-organized structure that separates concerns and promotes maintainability:
clickhouse-ansible/
├── config.yml                  # Central configuration file
├── inventory.yml               # Generated inventory file
├── deploy_clickhouse.yml       # Main deployment playbook
├── setup_inventory.yml         # Inventory generator playbook
├── group_vars/                 # Group variables
│   └── all.yml                 # Common variables (generated)
├── roles/
│   ├── common/                 # Common setup tasks
│   │   └── tasks/
│   │       ├── main.yml
│   │       ├── install_pre_req.yml
│   │       ├── system_optimizations.yml
│   │       ├── monitoring.yml
│   │       ├── health_checks.yml
│   │       ├── verify_cluster.yml
│   │       ├── clickhouse_keeper/
│   │       └── clickhouse_server/
│   ├── clickhouse_server/      # Server role
│   │   ├── handlers/
│   │   ├── tasks/
│   │   └── templates/
│   └── clickhouse_keeper/      # Keeper role
│       ├── handlers/
│       ├── tasks/
│       └── templates/
└── templates/                  # Templates for generators
    ├── inventory.j2
    └── all.yml.j2
bash
This structure adheres to Ansible best practices with role-based organization:
- Roles: Define the server and keeper configurations independently
- Tasks: Modular, reusable configuration steps
- Templates: Jinja2-powered configuration generation
- Handlers: Service restart notifications
The Configuration Hub: config.yml
The config.yml file serves as the single source of truth for all deployment parameters. Let's examine some key sections:
# Hardware configuration
cpu_cores: 16
ram_gb: 64
bash
# ClickHouse version
clickhouse_version: "25.3.2.39"# Cluster configuration
cluster_name: "clickhouse_cluster"
cluster_secret: "mysecretphrase"
shard_count: 1
replica_count: 3# Network ports
keeper_port: 9181
keeper_raft_port: 9234
clickhouse_port: 9000
clickhouse_http_port: 8123# Keeper and server nodes
keeper_ips:
- "13.91.32.134"
- "13.91.224.109"
- "13.91.246.177"server_ips:
- "13.64.100.15"
- "40.112.129.86"
- "40.112.134.238"# Performance tuning
hardware_profile: "auto" # Options: auto, small, medium, large, custom# Auto-tuning parameters
memory_ratio:
server_usage_to_ram_ratio: 0.8
mark_cache_percent: 0.2
uncompressed_cache_percent: 0.2
yamlThis configuration allows users to:
- Specify hardware resources (CPU cores, RAM)
- Define the cluster topology (shards, replicas)
- List IP addresses for server and keeper nodes
- Select a hardware profile for performance tuning
The hardware profile selector is particularly powerful, automatically mapping to optimized resource allocation settings based on available hardware.
Hardware-Aware Configuration: The Secret Sauce
One of the most powerful features of this automation is its ability to automatically calculate optimal ClickHouse settings based on available hardware. This is implemented through hardware profiles:
hw_profile_params:
  small:
    max_server_memory_usage_to_ram_ratio: 0.7
    max_server_memory_usage: '{{ (ram_bytes | int * 0.7) | int }}'
    background_pool_size: '{{ [4, cpu_cores | int * 0.5] | min | int }}'
    mark_cache_size: '{{ (ram_bytes | int * 0.1) | int }}'
    uncompressed_cache_size: '{{ (ram_bytes | int * 0.1) | int }}'
  medium:
    max_server_memory_usage_to_ram_ratio: 0.75
    max_server_memory_usage: '{{ (ram_bytes | int * 0.75) | int }}'
    background_pool_size: '{{ [8, cpu_cores | int * 0.75] | min | int }}'
    mark_cache_size: '{{ (ram_bytes | int * 0.15) | int }}'
    uncompressed_cache_size: '{{ (ram_bytes | int * 0.15) | int }}'
  large:
    max_server_memory_usage_to_ram_ratio: 0.8
    max_server_memory_usage: '{{ (ram_bytes | int * 0.8) | int }}'
    background_pool_size: '{{ cpu_cores | int }}'
    mark_cache_size: '{{ (ram_bytes | int * 0.2) | int }}'
    uncompressed_cache_size: '{{ (ram_bytes | int * 0.2) | int }}'
yaml
For the “auto” profile, the automation calculates settings dynamically:
auto_profile:
  max_server_memory_usage_to_ram_ratio: '{{ memory_ratio.server_usage_to_ram_ratio }}'
  max_server_memory_usage: '{{ (ram_bytes | int * memory_ratio.server_usage_to_ram_ratio) | int }}'
  background_pool_size: '{{ cpu_cores | int }}'
  mark_cache_size: '{{ (ram_bytes | int * memory_ratio.server_usage_to_ram_ratio * memory_ratio.mark_cache_percent) | int }}'
  uncompressed_cache_size: '{{ (ram_bytes | int * memory_ratio.server_usage_to_ram_ratio * memory_ratio.uncompressed_cache_percent) | int }}'
yaml
These calculations ensure that critical parameters like memory limits, cache sizes, and thread pools are proportioned appropriately for the available hardware, eliminating guesswork and manual tuning.
Dynamic Inventory Generation
Rather than manually maintaining an inventory file, the solution dynamically generates it based on the configuration. The setup_inventory.yml playbook processes the configuration and creates:
- An
inventory.ymlfile with the server layout - A
group_vars/all.ymlfile with derived variables
The inventory generation template implements a sophisticated algorithm that:
{% for i in range(total_nodes|int) %}
{% set current_shard = (i // replica_count|int) + 1 %}
{% set current_replica = (i % replica_count|int) + 1 %}
{% if i < server_ips|length %}
            clickhouse-s{{ '%02d' % current_shard }}-r{{ '%02d' % current_replica }}:
              ansible_host: {{ server_ips[i] }}
              ansible_ssh_private_key_file: "{{ server_ssh_key_path }}"
              shard: "{{ '%02d' % current_shard }}"
              replica: "{{ '%02d' % current_replica }}"
{% endif %}
{% endfor %}
yaml
This template:
- Calculates the appropriate shard and replica ID for each server
- Assigns sequential IDs to Keeper nodes
- Creates consistent hostname patterns
- Sets appropriate SSH connection parameters
System Optimization Deep Dive
ClickHouse’s performance depends significantly on system-level optimizations. The automation applies key optimizations:
- name: Configure sysctl parameters for ClickHouse
  sysctl:
    name: '{{ item.name }}'
    value: '{{ item.value }}'
    state: present
    reload: yes
  with_items:
    - { name: 'vm.swappiness', value: '0' } # Minimize swapping
    - { name: 'vm.max_map_count', value: '1048576' } # Increase memory map areas
    - { name: 'net.core.somaxconn', value: '4096' } # TCP connection queue
    - { name: 'net.ipv4.tcp_max_syn_backlog', value: '4096' } # SYN backlog
    - { name: 'net.core.netdev_max_backlog', value: '10000' } # Network packet backlog
    - { name: 'net.ipv4.tcp_slow_start_after_idle', value: '0' } # Disable TCP slow start
    - { name: 'net.ipv4.tcp_fin_timeout', value: '10' } # Faster TCP connection cleanup
    - { name: 'net.ipv4.tcp_keepalive_time', value: '60' } # Faster dead connection detection
    - { name: 'net.ipv4.tcp_keepalive_intvl', value: '10' }
    - { name: 'net.ipv4.tcp_keepalive_probes', value: '6' }
    - { name: 'fs.file-max', value: '9223372036854775807' } # Maximum file handles
    - { name: 'fs.aio-max-nr', value: '1048576' } # Async IO operations limit
yaml
These optimizations focus on:
- Memory Management: Minimize swapping and increase memory mapping limits
- Network Performance: Optimize TCP connection handling and backlog queues
- File Handling: Increase file descriptor limits for high connection counts
- Disk I/O: Configure asynchronous I/O parameters
Additionally, the playbook disables transparent huge pages (THP), which can cause performance issues for databases:
- name: Disable transparent huge pages
  shell: |
    echo never > /sys/kernel/mm/transparent_hugepage/enabled
    echo never > /sys/kernel/mm/transparent_hugepage/defrag
bash
And creates a systemd service to ensure this setting persists across reboots.
ClickHouse Keeper Configuration
ClickHouse Keeper (introduced in version 22.x as a ZooKeeper replacement) is configured as a distributed coordination service:
<clickhouse>
    <keeper_server>
        <tcp_port>{{ clickhouse_keeper_port }}</tcp_port>
        <server_id>{{ server_id }}</server_id>
        <log_storage_path>{{ clickhouse_keeper_coordination_dir }}/logs</log_storage_path>
        <snapshot_storage_path>{{ clickhouse_keeper_coordination_dir }}/snapshots</snapshot_storage_path>
        <coordination_settings>
            <operation_timeout_ms>10000</operation_timeout_ms>
            <min_session_timeout_ms>10000</min_session_timeout_ms>
            <session_timeout_ms>100000</session_timeout_ms>
            <raft_logs_level>{{ clickhouse_keeper_log_level }}</raft_logs_level>
        </coordination_settings>
        <raft_configuration>
            {% for host in groups['clickhouse_keepers'] %}
            <server>
                <id>{{ hostvars[host].server_id }}</id>
                <hostname>{{ hostvars[host].ansible_host }}</hostname>
                <port>{{ clickhouse_keeper_raft_port }}</port>
            </server>
            {% endfor %}
        </raft_configuration>
    </keeper_server>
</clickhouse>
xml
This configuration:
- Sets up proper logging with rotation
- Configures connection handling
- Establishes unique server IDs
- Defines RAFT consensus protocol parameters
- Creates a complete list of all Keeper nodes for coordination
ClickHouse Server Cluster Configuration
The server configuration manages the distributed cluster setup through several key files:
1. Macros for Sharding/Replication
<clickhouse>
    <macros>
        <shard>{{ shard }}</shard>
        <replica>{{ replica }}</replica>
        <cluster>{{ clickhouse_cluster_name }}</cluster>
    </macros>
</clickhouse>
xml
These macros identify each server’s role in the cluster and are used in table definitions.
2. Remote Servers (Cluster Definition)
<clickhouse>
    <remote_servers replace="true">
        <{{ clickhouse_cluster_name }}>
            <secret>{{ clickhouse_secret }}</secret>
            {% set ns = namespace(shard_hosts={}) %}
            {# Group servers by shard #}
            {% for host in groups['clickhouse_servers'] %}
                {% set shard_num = hostvars[host].shard | int %}
                {% if shard_num not in ns.shard_hosts %}
                    {% set ns.shard_hosts = ns.shard_hosts | combine({shard_num: []}) %}
                {% endif %}
                {% set _ = ns.shard_hosts[shard_num].append(host) %}
            {% endfor %}
            {# Create shards with proper replica configuration #}
            {% for shard_num, hosts in ns.shard_hosts.items() | sort %}
            <shard>
                <internal_replication>true</internal_replication>
                {% for host in hosts %}
                <replica>
                    <host>{{ hostvars[host].ansible_host }}</host>
                    <port>{{ clickhouse_server_port }}</port>
                </replica>
                {% endfor %}
            </shard>
            {% endfor %}
        </{{ clickhouse_cluster_name }}>
    </remote_servers>
</clickhouse>
yaml
This sophisticated template:
- Uses Jinja2 namespacing to create temporary data structures
- Groups servers by shard number
- Creates nested shard and replica definitions
- Enables internal replication for Keeper coordination
Security Implementation
The security configuration is comprehensive, including:
SSL/TLS Setup
- name: Generate self-signed SSL certificate if not exists
  shell: |
    openssl req -new -newkey rsa:2048 -days 365 -nodes -x509 \
      -subj "/C=US/ST=CA/L=SF/O=ClickHouse/CN={{ inventory_hostname }}" \
      -keyout /etc/clickhouse-server/ssl/server.key \
      -out /etc/clickhouse-server/ssl/server.crt
  args:
    creates: /etc/clickhouse-server/ssl/server.crt
  when: ssl_enabled | bool
yaml
This creates:
- Self-signed certificates per server
- Strong Diffie-Hellman parameters for secure key exchange
- Proper file permissions for security
User Authentication and Authorization
<clickhouse>
    <users>
        <default>
            <!-- Disable default user or set a strong password -->
            <password></password>
            <profile>default</profile>
            <quota>default</quota>
            <access_management>0</access_management>
        </default>
        <admin>
            <password_sha256_hex>{{ admin_password_hash | default('8d969eef6ecad3c29a3a629280e686cf0c3f5d5a86aff3ca12020c923adc6c92') }}</password_sha256_hex>
            <profile>admin</profile>
            <quota>default</quota>
            <access_management>1</access_management>
            <networks>
                <ip>::1/128</ip>
                <ip>127.0.0.1/32</ip>
                <ip>{{ network_access }}</ip>
            </networks>
        </admin>
    </users>
</clickhouse>
xml
This configuration implements:
- Hashed password storage
- IP-based access restrictions
- Resource profiles to limit memory and CPU usage
- Query execution quotas
Monitoring and Backup Solutions
Prometheus Integration
<clickhouse>
<prometheus>
<endpoint>/metrics</endpoint>
<port>{{ prometheus_port }}</port>
<metrics>true</metrics>
<events>true</events>
<asynchronous_metrics>true</asynchronous_metrics>
</prometheus>
</clickhouse>
yaml
This exposes ClickHouse metrics in Prometheus format on a dedicated port.
Health Check Scripts
The automation deploys custom health check scripts for proactive monitoring:
#!/bin/bash
# ClickHouse Server Health Check Script
# Check if ClickHouse server is running
if ! pgrep -x "clickhouse-server" > /dev/null; then
  echo "ERROR: ClickHouse server is not running!"
  exit 1
fi
# Check if we can connect to the server
if ! clickhouse-client --query "SELECT 1" &>/dev/null; then
  echo "ERROR: Cannot connect to ClickHouse server!"
  exit 1
fi
# Check server uptime
UPTIME=$(clickhouse-client --query "SELECT uptime()")
echo "ClickHouse server uptime: ${UPTIME} seconds"
# Check system.errors count
ERRORS=$(clickhouse-client --query "SELECT count() FROM system.errors")
if [ "$ERRORS" -gt 0 ]; then
  echo "WARNING: Found ${ERRORS} errors in system.errors table!"
else
  echo "No errors found in system.errors table"
fi
# Additional checks for memory, disk usage, replication status...
bash
Backup Solution
The automation implements the clickhouse-backup tool for consistent backups:
- name: Create backup cron job
  cron:
    name: 'ClickHouse backup'
    user: clickhouse
    hour: '1'
    minute: '0'
    job: '/usr/local/bin/clickhouse-backup create && {% if remote_backup_enabled | bool %}/usr/local/bin/clickhouse-backup upload{% endif %}'
    state: present
  when: backup_enabled | bool
yaml
The backup configuration supports both local backups and remote S3-compatible storage.
Schema Management
The automation includes initial schema setup with support for replicated tables:
CREATE TABLE IF NOT EXISTS analytics.events
(
    event_date Date,
    event_time DateTime,
    event_type String,
    user_id String,
    session_id String,
    properties String
)
ENGINE = ReplicatedMergeTree('/clickhouse/tables/{shard}/analytics.events', '{replica}')
PARTITION BY toYYYYMM(event_date)
ORDER BY (event_date, event_type, user_id);
sql
And distributed tables for cluster-wide queries:
CREATE TABLE IF NOT EXISTS analytics.events_distributed
(
    event_date Date,
    event_time DateTime,
    event_type String,
    user_id String,
    session_id String,
    properties String
)
ENGINE = Distributed('{{ clickhouse_cluster_name }}', 'analytics', 'events', rand());
sql
Deployment Workflow
The complete deployment workflow is a two-step process:
- Generate the Inventory:
ansible-playbook -i localhost, setup_inventory.yml -c local
bash- Deploy the Cluster:
ansible-playbook -i inventory.yml deploy_clickhouse.yml
bash
The deployment playbook executes in two phases:
- First, deploy and configure ClickHouse Keeper instances
- Then, deploy and configure ClickHouse Server instances
Each phase includes:
- OS preparation with package installation and optimization
- Core service installation
- Configuration generation
- Security hardening
- Monitoring setup
- Health check configuration
Advanced Usage Scenarios
Multi-Shard Configuration
For horizontal scaling, you can configure multiple shards:
shard_count: 3
replica_count: 2
server_ips:
  - "10.0.1.10"  # Shard 1, Replica 1
  - "10.0.1.11"  # Shard 1, Replica 2
  - "10.0.1.12"  # Shard 2, Replica 1
  - "10.0.1.13"  # Shard 2, Replica 2
  - "10.0.1.14"  # Shard 3, Replica 1
  - "10.0.1.15"  # Shard 3, Replica 2
bash
Geographic Distribution
For multi-datacenter setups, you can distribute replicas:
shard_count: 2
replica_count: 3
server_ips:
  - "10.1.1.10"  # DC1, Shard 1, Replica 1
  - "10.2.1.10"  # DC2, Shard 1, Replica 2
  - "10.3.1.10"  # DC3, Shard 1, Replica 3
  - "10.1.1.11"  # DC1, Shard 2, Replica 1
  - "10.2.1.11"  # DC2, Shard 2, Replica 2
  - "10.3.1.11"  # DC3, Shard 2, Replica 3
bash
Custom Hardware Profiles
For specialized workloads, you can create custom hardware profiles:
hardware_profile: "custom"
custom_profile:
  max_server_memory_usage_to_ram_ratio: 0.75
  max_server_memory_usage: 0  # Will be calculated based on RAM if set to 0
  background_pool_size: 0     # Will be set to CPU count if 0
  mark_cache_size: 0          # Will be calculated if 0
  uncompressed_cache_size: 0  # Will be calculated if 0
bash
Conclusion
This Ansible automation provides a robust, enterprise-grade solution for deploying ClickHouse clusters with optimal configuration. The key advantages are:
- Hardware-aware configuration: Automatically tunes ClickHouse based on available resources
- Simplicity: Manages complex deployments with minimal configuration
- Security: Implements comprehensive security best practices
- Flexibility: Supports various cluster topologies and use cases
- Maintainability: Follows structured, role-based Ansible best practices
With this automation, organizations can rapidly deploy production-ready ClickHouse clusters without worrying about the intricacies of configuration optimization, security hardening, or operational readiness. The script provided sets up the entire Ansible project structure, creating all the necessary files and directories to implement this comprehensive ClickHouse deployment solution.
By leveraging this automation, teams can focus on using ClickHouse’s analytical capabilities rather than managing infrastructure complexity, ultimately accelerating their data analytics initiatives while maintaining operational excellence.
Looking for Enterprise-grade ClickHouse Support and Consulting
Discover how our team of experts can help you optimize your ClickHouse deployment, improve performance, and ensure reliability.


